Story
This project was created for the SAP Hybris Steam Kids program, a program dedicated to encourage digital literacy and to promote coding skills at school. We have chosen to use the Calliope Mini and provide a step-by step guide which is suitable for classroom use.
Using two calliopes and one potentiometer, you can easily create your own little messenger. Of course it will require both calliope mini to be somewhat close to each other so the radios can transmit and receive, but it easily work over a few meters and definitely within the classroom. There are many ways to extend and change this project, so feel free to drop me a line via twitter (@hansamann) in case you do.
A short video of how this works at the end can be seen here.
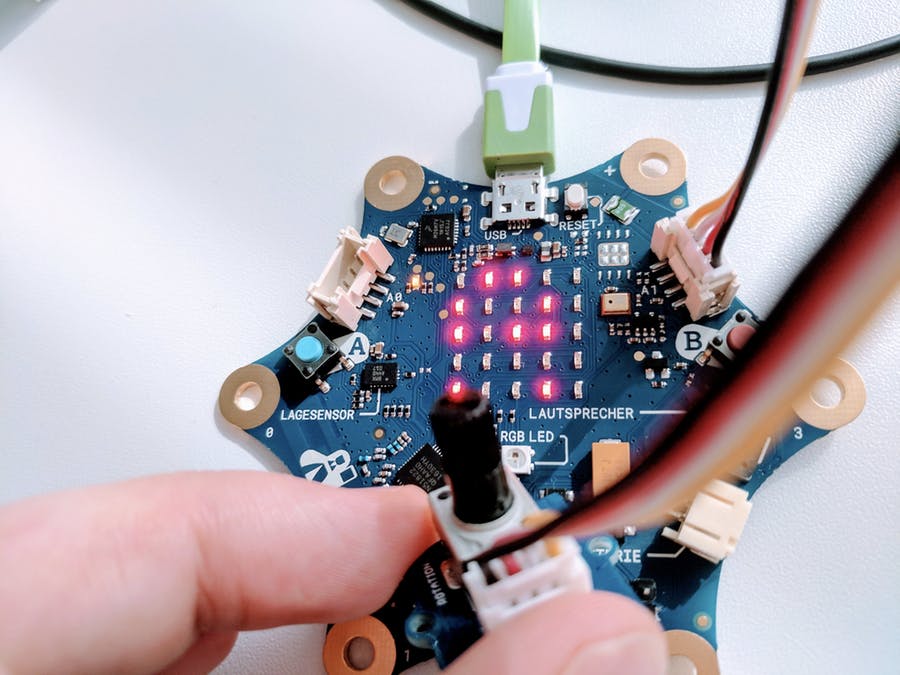
This project requires two calliope minis - one sender and one receiver. The sender will additionally require a potentiometer that attaches to the analog grove port (the right one) of the calliope mini. Using the potentiometer, you will be able to choose the characters out of the alphabet to add to your message.
The Sender
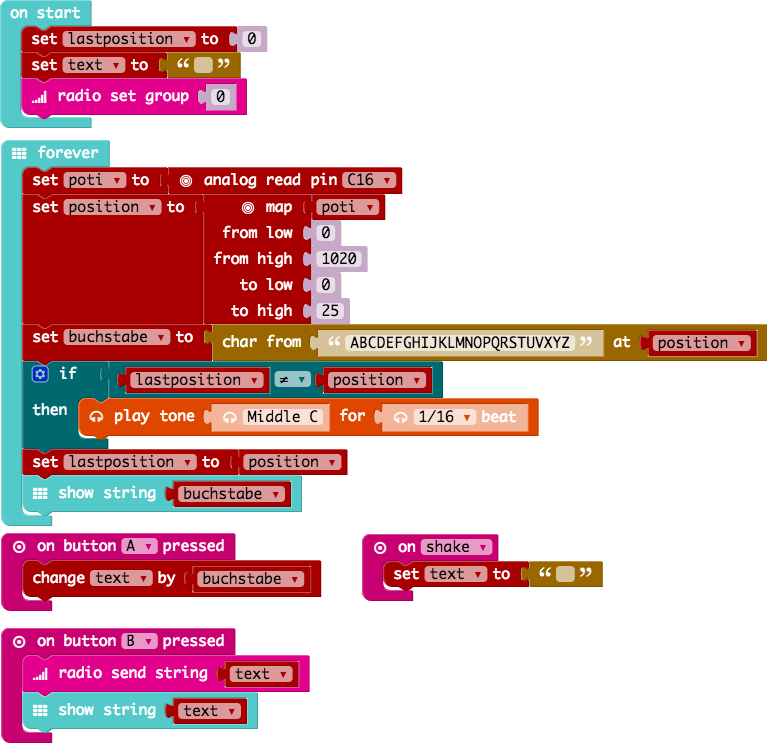
Part 1 - Selecting a character using the potentiometer
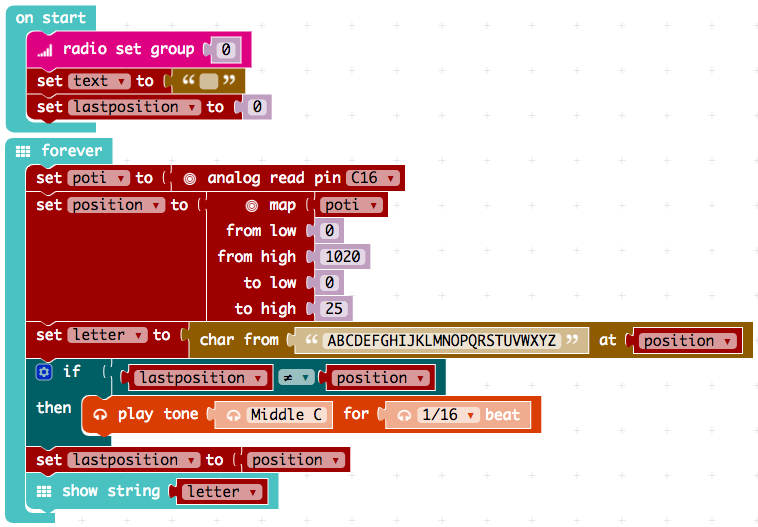
The Calliope can read the changing input voltage at the groove pins and map it to a value between 0 and 1023. In the following example, the potentiometer variable holds the current measured value of pin C16, which is a pin on the right slot connector. You cannot connect the potentiometer to the left grove connector, as this connector can only do digital communication while the right one supports analog input.
As we have 26 characters in our alphabet, we need to convert the range of 0-1023 to 0 to 25. For this we can use the map block as shown below. As our potentiometer did not quite give use the full range of input (1023), I've restricted the from low to 1020.

Part 2 - adding sound for UX (User Experience)
Next, we make the experience of turning the knob and selecting a character a bit more exciting. Adding some sound will improve the experience. To know if the user has rotated the potentiometer far enough to change the current character, we must store the last character's position to compare it.
We begin with adding an 'on start' block and initializing the position to 0. In the forever block, we now check if the position that we just calculated has changed from the last position. If there is a change, we play a very quick sound. We now need to update the last position so we can compare it again in the next iteration.
Part 3 - Linking characters to a piece of text
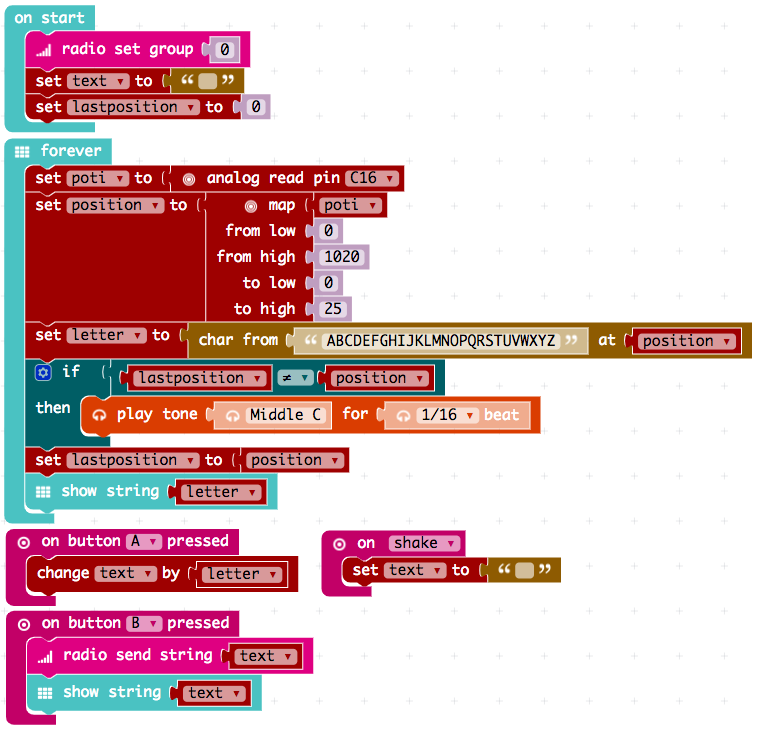
At this point we can select characters, but we still cannot build a message. For this, we first create a text variable that we can add our characters to. When button A is pressed, we add the currently chosen character (buchstabe, ups, German). B will show the text at this point, later we will send the text on via radio. A shake will clear our text for the next transmission.
Note that we cannot only add numbers to other numbers. We can add characters to variables holding text. The characters will be added to the end of the text variable (called string).
Part 4 - sending the message
Now we just need to send our message. Especially if you work in teams and have different computers, it is very important to set the same radio group. The editor will otherwise choose a random group and the two calliope minis can later not communicate.
For sending the message, we just need to modify the blocks in the 'on button A pressen' block a bit. We first send the message (this is very fast) and then show the message like before on the screen.
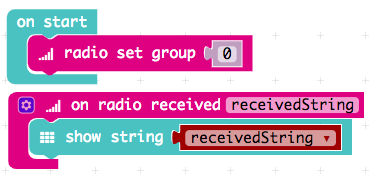
The Receiver
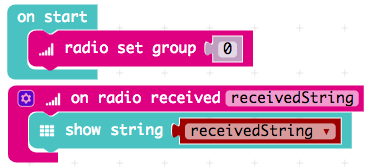
The reception calliope mini is very simple: It must be set to the same radio group and then simply displays the received messages.
Further ideas
- Instead of choosing a character to add to the text and then send the text, you could choose an icon and send a number for that icon instead. You need to agree with the receiver what the numbers you send mean - this is called a protocol.
- Explore sending the message to multiple receivers
- How would you add the capability to send a message back to the sender?
Schematics
Calliope sender complete
Calliope receiver complete
This text as well as the image is published under a CC BY-SA 3.0 DE license. It was originally published in English
by Sven Haiges and edited by the Calliope team.