On this page you will learn how to get the Calliope mini up and running step by step. The first step shows you how to connect the Calliope mini correctly to the power supply.
More ⟶
Your Calliope mini starts automatically as soon as it is connected to the power supply. To welcome you, go through a demo sequence with the different input options.
More ⟶
Calliope mini comes with some programs pre-installed that you can use to get started right away. How these programs work and what you can do with them is explained here.
More ⟶
Before you can start, the Calliope mini must be powered. There are two possibilities:
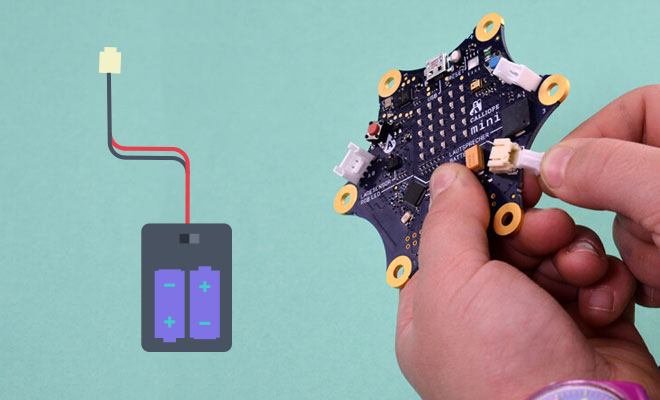
External battery compartment
-
fill the battery compartment with two batteries of type AAA. Make sure that the batteries are aligned correctly.
-
take the battery block provided and carefully insert the small, white plastic end (JST connector) into the battery connector attached to the Calliope mini.
Make sure that the closed end of the plug is at the top with the raised part in the middle. If the cable connector fits easily into the battery connector on the board, it is correct.


computer
-
take the USB cable and plug the smaller, narrower side into the USB port on the Calliope mini. This is located at the very top in the middle of the board.
-
plug the other end of the cable into the USB port on your computer.
1. press the button A.
2. press the button B.
3. press the keys A+B simultaneously.
4. The position sensor - shake the Calliope mini.
5. Ready!


The standard menu allows navigation through five pre-installed programs.
- Use the A and B buttons to scroll through the five programs.
- Shake to confirm the selected program.
- Press the two buttons A and B simultaneously to enter the menu.
How these programs work and what you can do with them is explained here or within the flyer from the Calliope mini box. Here you can open that flyer again.
If you want to play this file again on your Calliope mini, you can alway install it again to you Calliope mini.
DEMO FIRMWARE.HEX
- ask a question that can only be answered with YES or NO. Now press the button A.
The Calliope mini will then answer your questions with a 🙂 for YES or a 🙁 for No. - press simultaneously the two buttons A and B to enter the menu. Select a more exercise there.


- plays in pairs. Take your Calliope mini in your hand and gently shake it.
- one of the four symbols will randomly appear on the LED display.
- fountain beats scissors and stone; stone beats scissors; scissors beats paper; paper beats stone and fountain.
Whoever gets three points first wins!


- press the button A your Calliope mini to display the first factor.
Then press the button B to display the second factor. - now you are in demand!
Calculate the result in your head. If you want to know if your answer is correct, shake your Calliope mini and you will see the result.
Test your 1x1 knowledge!


The microphone is used to measure the ambient volume. The LED display shows you the noise level.
- if it is quiet, the RGB LED lights green.
- when loud, the RGB LED lights red.


The program shows you the individual identification of your Calliope mini. This pattern is needed if you want to connect your mini to a tablet or smartphone and transfer programs wirelessly. For more information, see the page about Bluetooth.
